Setting Up a Lab to Deploy Azure Local SFF on an Azure VM
Setting Up a Lab to Deploy Azure Local SFF on an Azure VM
A step-by-step walkthrough for running a three-node Azure Local Small Form Factor cluster in the cloud-using nested Hyper-V on a single Azure VM.
I wanted to get hands-on with Azure Local (the small form factor / SFF offering) without having physical hardware. Azure Local SFF uses zero-touch provisioning (ZTP), so I needed an environment that could simulate that: nested VMs on an Azure host, booting from the official installer ISO and getting IPs via DHCP, just like real devices would.
I wanted the option to host three VMs within the host to accomodate for SFF cluster testing. This can be achieved by manually deploying Kubernetes to the nodes. Microsoft currently only support AKS deployment to a single node for the current preview, but when 3 nodes is supported, it’s ready to support!
This post walks through how I set up that lab from Terraform and remote state, through first boot and voucher retrieval. The repository also includes a Bicep alternative that models the same Azure resources; see DEPLOYMENT.md if you prefer az deployment over Terraform.
What You’re Building
By the end you’ll have:
- One big Azure VM (Windows Server 2025, 32 vCPUs, 256 GB RAM) with nested virtualization, no public IP, and access via Azure Bastion.
- Three nested Hyper-V VMs that boot from the Azure Local SFF installer ISO, get IPs from a built-in DHCP scope, and are ready for ZTP/voucher collection.
- Automation that: provisions the infra with Terraform (or Bicep per the repo’s
DEPLOYMENT.md), configures the host with a setup script on first boot, and gives you a script to pull FDO vouchers from the nodes.
If you’re new to Azure Local Small Form Factor or ZTP, this is a great way to see the full flow without touching hardware.
Get the repo
The lab is in this GitHub repo: az-local-SFF-lab.
Clone it so you have the Terraform (or Bicep) config and scripts locally (use a folder you’re happy running commands from):
HTTPS:
git clone https://github.com/dmc-tech/az-local-SFF-lab.git
cd az-local-SFF-lab
SSH (if you use SSH keys with GitHub):
git clone git@github.com:dmc-tech/az-local-SFF-lab.git
cd az-local-SFF-lab
All the steps below assume you’re running commands from the repo root (or from the bootstrap folder when we say so).
Prerequisites
Before starting, make sure you have:
- Terraform (1.0 or newer) installed - install Terraform.
- Azure CLI installed and logged in (
az login) with the subscription you want to use - install Azure CLI. - Enough quota in your chosen region for a
Standard_E32s_v5VM and Azure Bastion (check in the Azure Portal if you’re not sure).
Step 1 - Bootstrap Terraform State (One-Time)
I prefer keeping Terraform state in Azure Storage so it’s durable and shareable. The repo includes a small bootstrap module that creates the storage account and container. You only do this once per environment.
1.1 Open a terminal and go into the bootstrap folder of the repo.
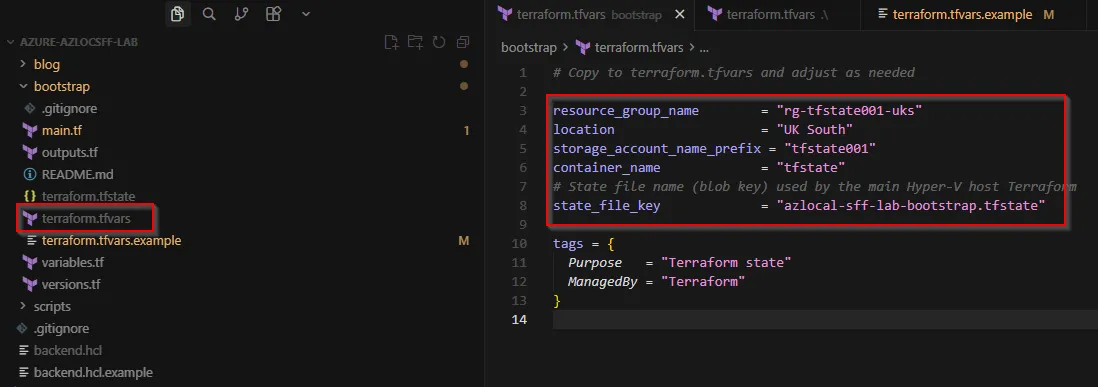
1.2 Copy the example variables file and edit it with your preferred region and names:
copy terraform.tfvars.example terraform.tfvars(On macOS/Linux use cp instead of copy.)
Edit terraform.tfvars and set things like resource_group_name, location, storage_account_name_prefix, container_name, and state_file_key to whatever fits your naming convention.
1.3 Initialise and apply the bootstrap:
terraform init
terraform plan
terraform apply
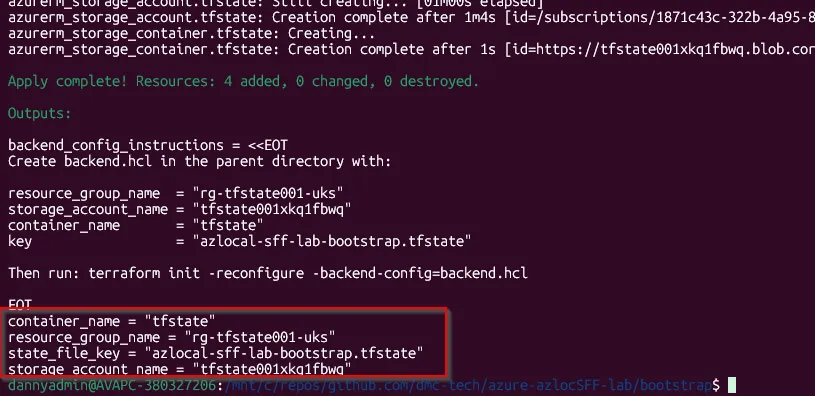
1.4 Note the outputs: storage_account_name, resource_group_name, container_name, and the state file key. You’ll need these for the main Terraform backend.
Step 2 - Configure the Main Terraform Backend
2.1 In the root of the repo (not inside bootstrap), copy the backend example and create your real backend config:
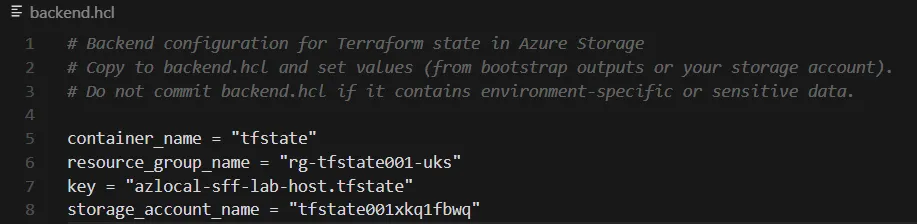
copy backend.hcl.example backend.hcl2.2 Open backend.hcl and fill in the values from the bootstrap outputs:
resource_group_name- the resource group where the state storage account livesstorage_account_name- from bootstrap outputcontainer_name- from bootstrap outputkey- e.g.azlocal-sff-lab-bootstrap.tfstate(must match what you use in bootstrap if you parameterised it)
2.3 Initialise the main Terraform with that backend:
terraform init -reconfigure -backend-config=backend.hclYou should see Terraform successfully initialising the Azure backend. Don’t commit backend.hcl if it has environment-specific or sensitive names.
Step 3 - Set Your Main Variables and Deploy
3.1 Copy the example tfvars and create your own:
copy terraform.tfvars.example terraform.tfvars3.2 Edit terraform.tfvars. The important one is admin_password: it must meet Azure’s Windows VM password rules (length and complexity). Set a strong password and keep it safe, you’ll use it to sign in via Bastion.
You can also tweak:
resource_group_name,location,environmentvm_name(max 15 characters-Windows computer name limit)data_disk_size_gb(default is 1024 for 1 TB)tags
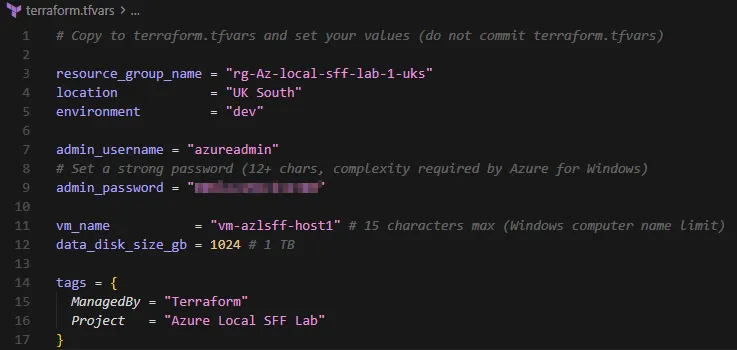
3.3 Run a plan to see what will be created:
terraform planYou should see the resource group, vnet, subnets, NAT gateway, Bastion, Windows VM, data disk, storage account for scripts, and the VM extension. If anything looks off, adjust variables and plan again.
3.4 Apply:
terraform applyConfirm when prompted. The apply will take several minutes: it creates all the Azure resources, installs the Hyper-V and DHCP roles on the VM, copies the setup and voucher scripts to the VM, configures auto-logon and RunOnce, and reboots the VM.
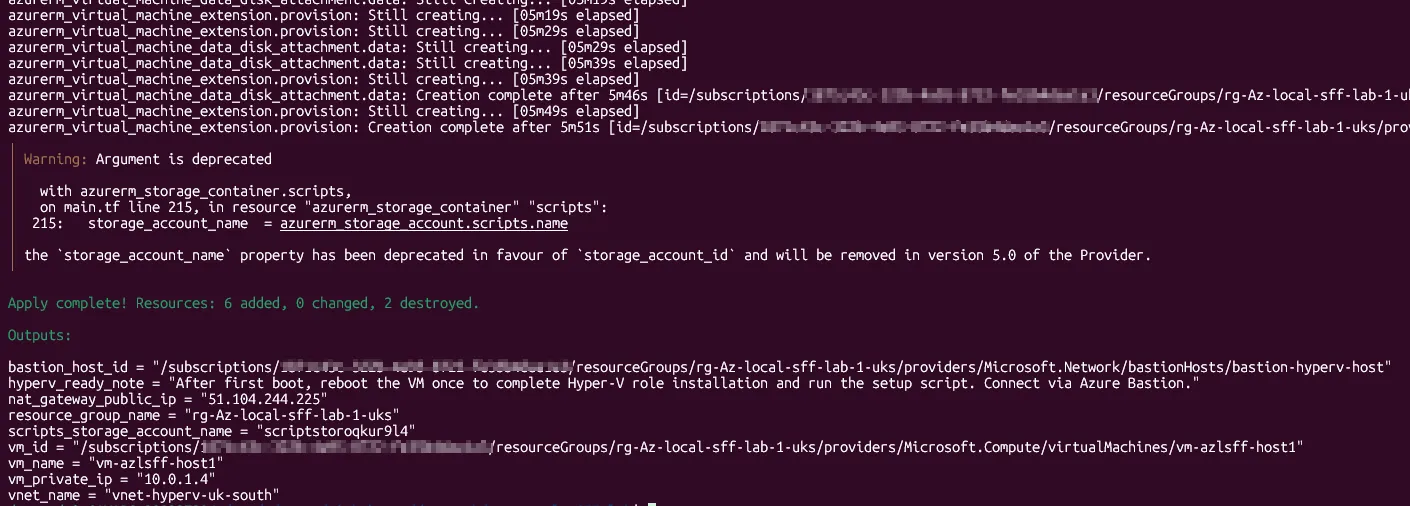
Step 4 - Wait for First Boot and setup.ps1
After the reboot, the VM comes up, auto-logs on once, and runs setup.ps1 automatically. That script:
- Brings the 1 TB data disk online, formats it, and assigns
F:\ - Creates folders under
F:\Hyper-Vfor VMs, VHDs, and images - Downloads the Azure Local installer ISO from
aka.ms/ztp/installeros - Creates an internal Hyper-V switch with NAT (
192.168.100.0/24) and configures DHCP for the nested VMs - Creates three nested VMs (NestedVM-01, 02, 03) with 8 vCPUs and 16 GB RAM each, vTPM enabled
- Attaches the ISO to each VM and boots them with DVD-first
Give it 15–30 minutes depending on download speed. The script is idempotent and writes a completion flag, so it won’t re-run on later logons. Logs go to C:\Scripts\setup.log.
Step 5 - Connect via Azure Bastion
5.1 In the Azure Portal, open your resource group and select the Windows VM.
5.2 Click Connect and choose Bastion.
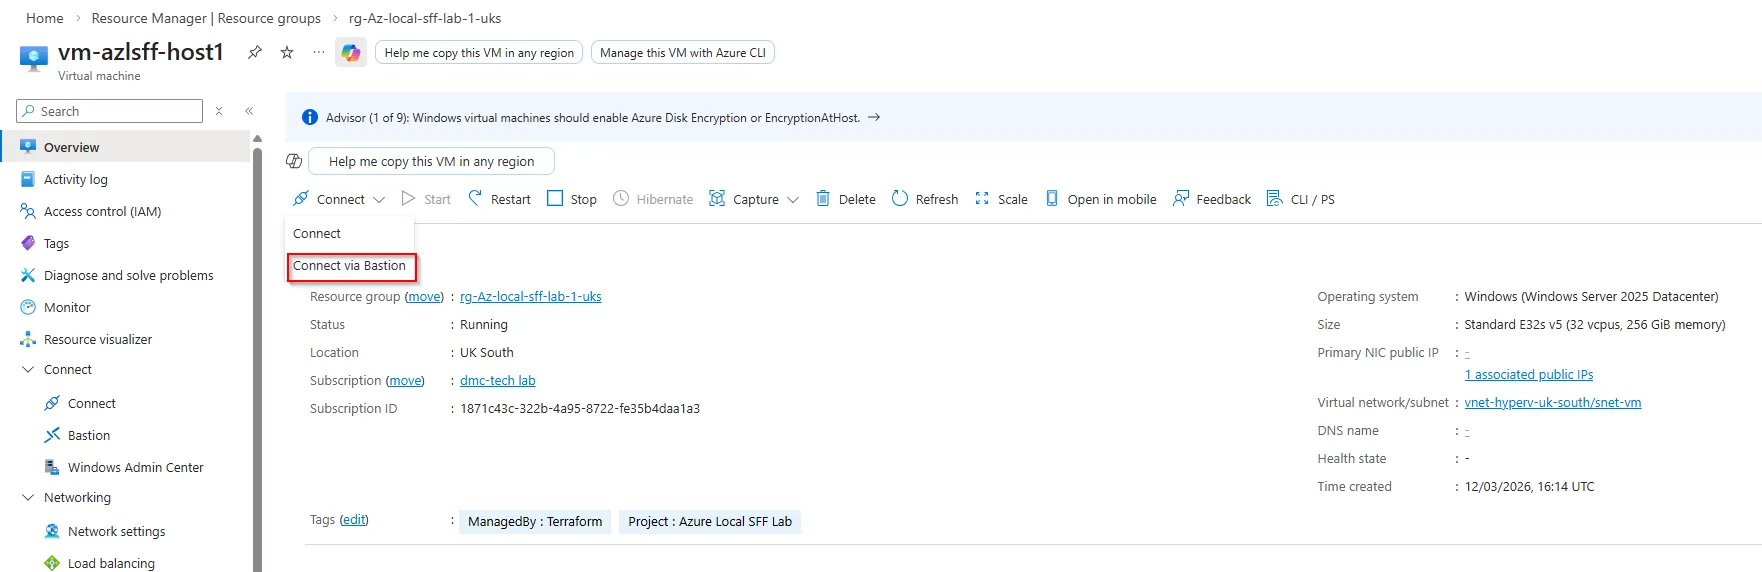
5.3 Enter the username and password from your terraform.tfvars and sign in. You’ll get an RDP session in the browser-no public IP on the VM, which keeps things locked down.
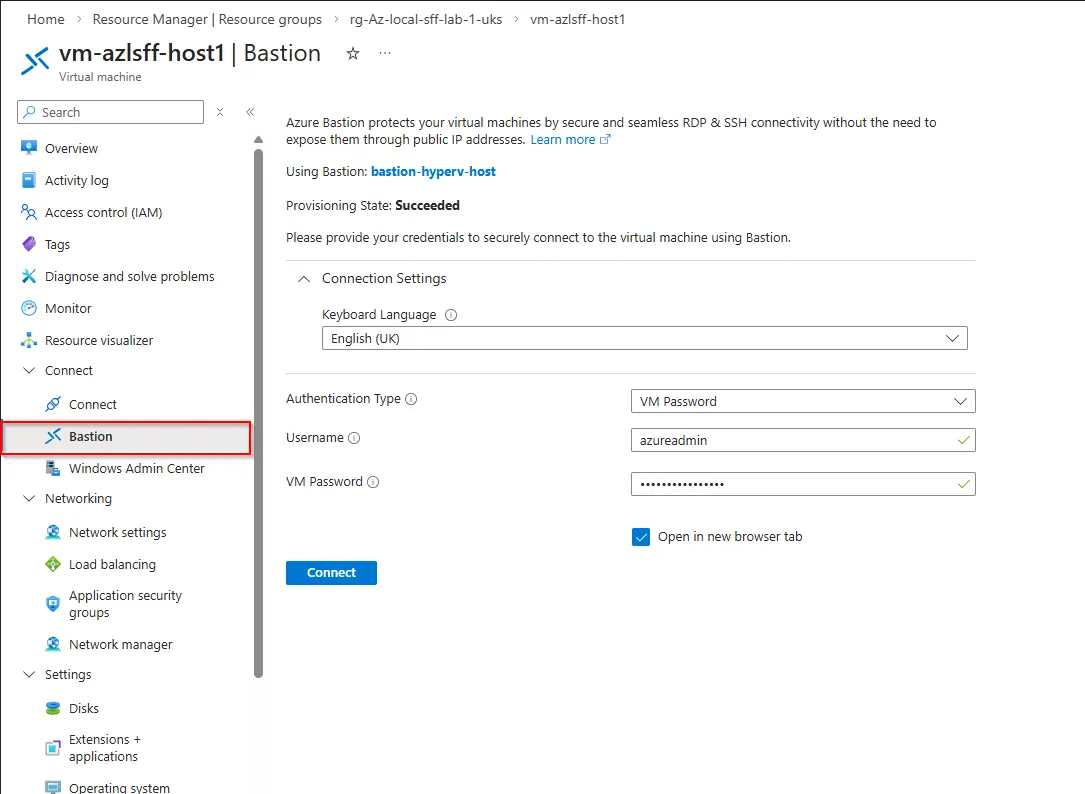
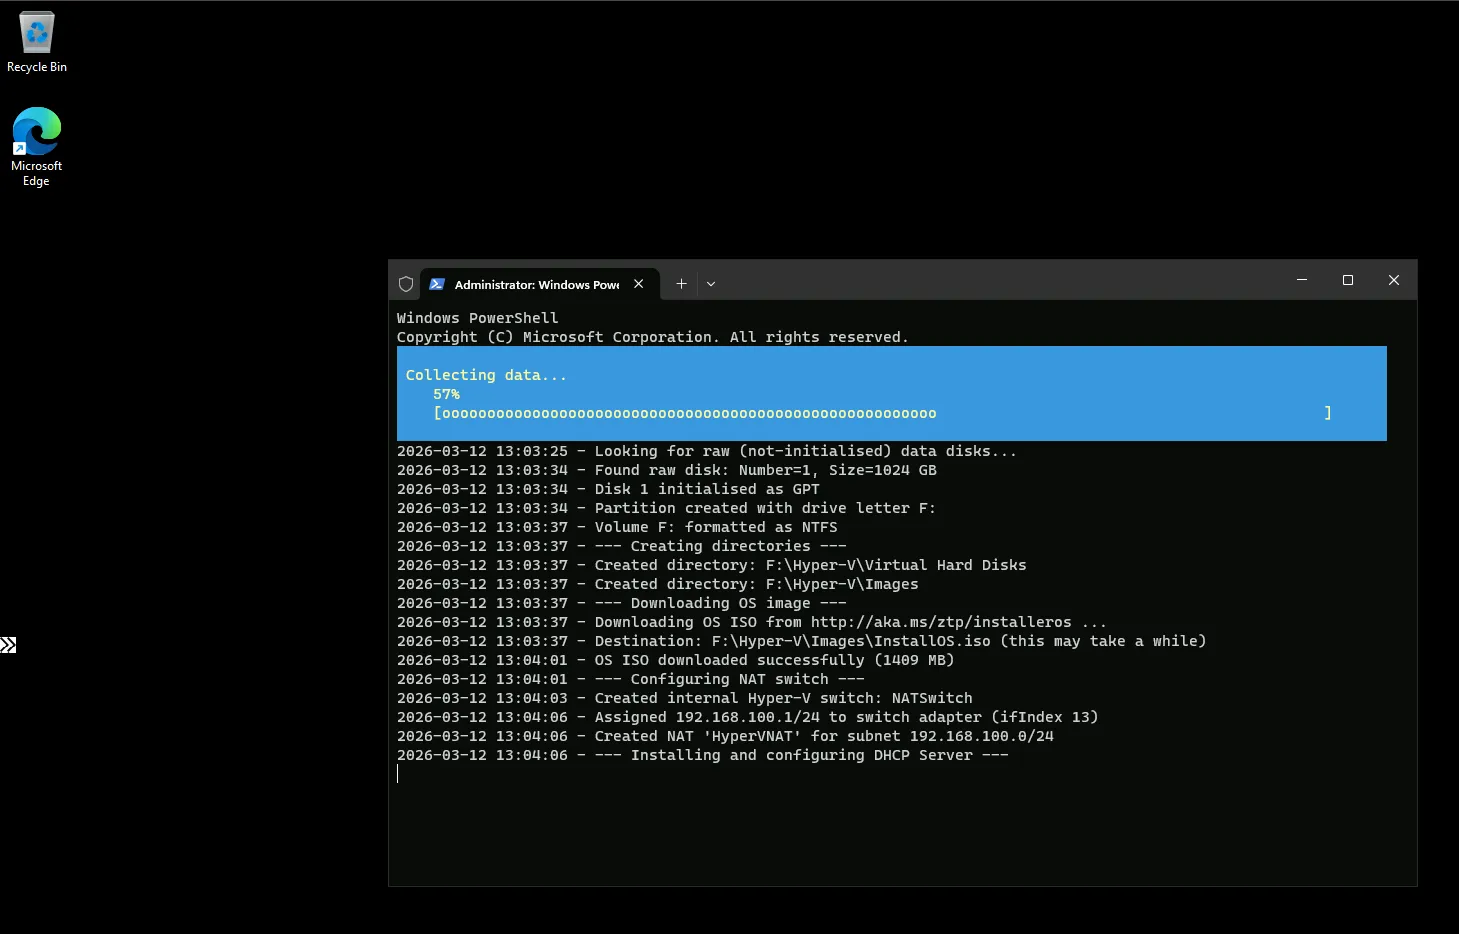
If you connect when the machine is still provisioning, You should see a PowerShell window with setup.ps1 running (and optionally the setup log). Once you’re in, you can leave the session open or disconnect; the script keeps running (as long as you don’t close the PowerShell console!).
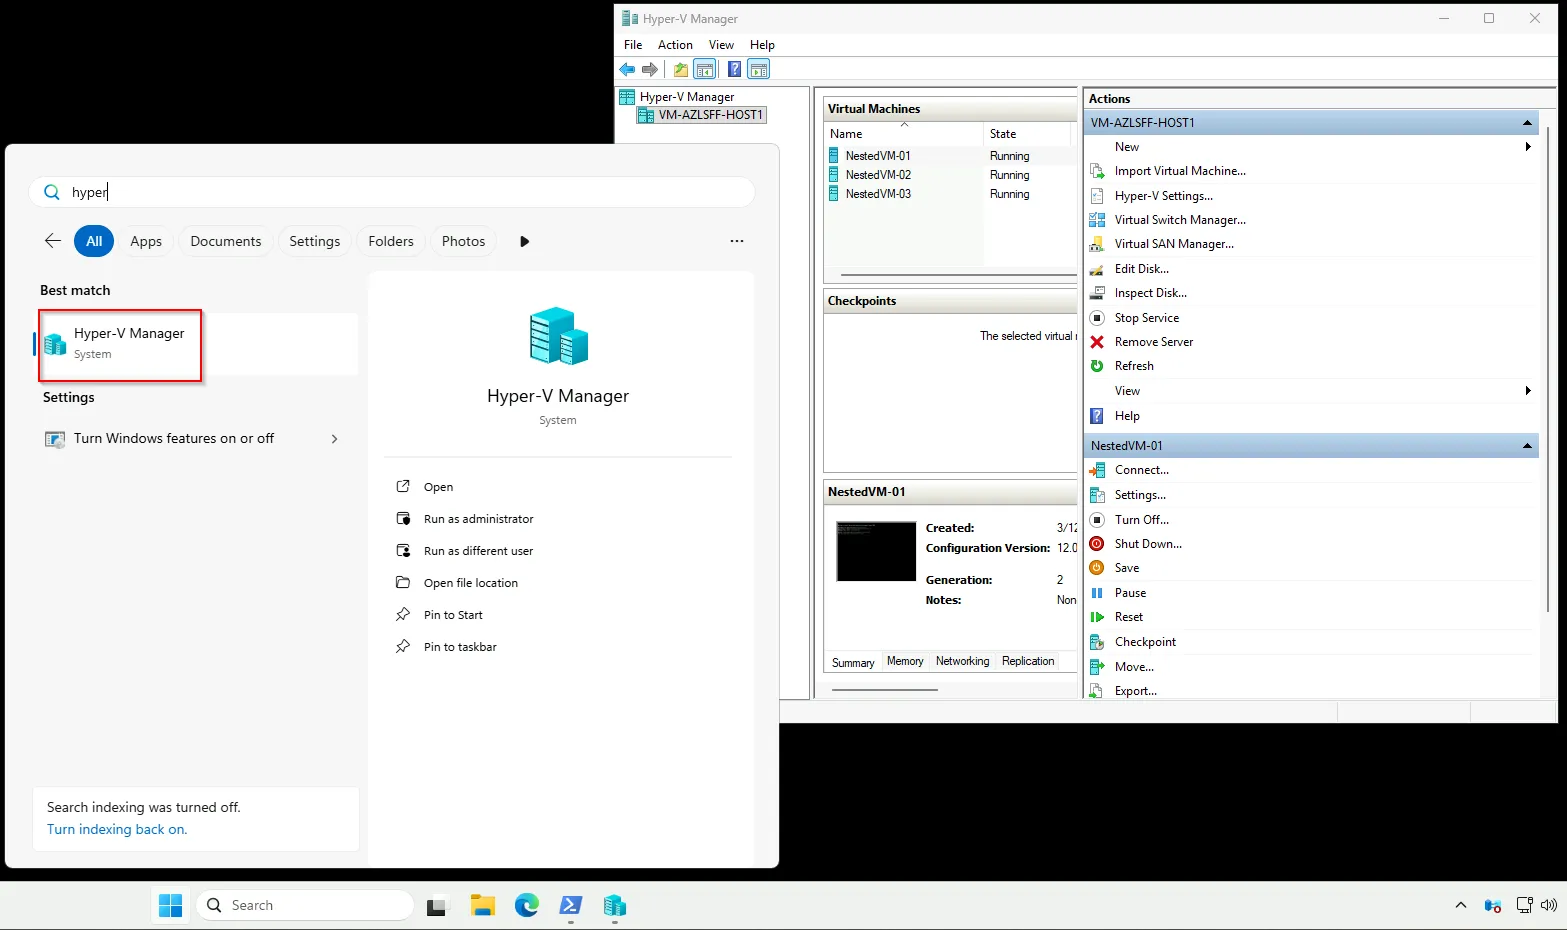
5.4 Once you’re in, you can open Hyper-V Manager and confirm the three nested VMs are present and running. They should be booting (or already booted) from the Azure Local installer ISO.
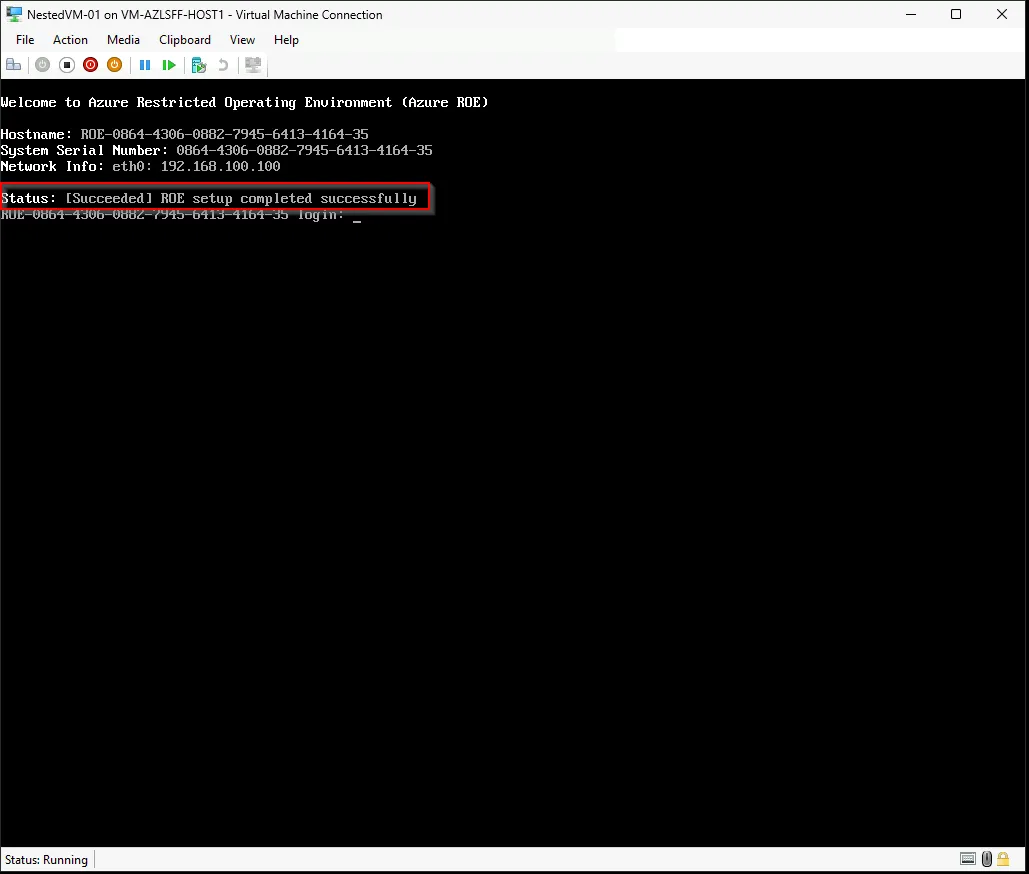
If you open the console for one of the nodes, youshould hopefully see that the ROE (Restricted Operating Environment) has been successfully provisioned:
Step 6 - Retrieve FDO Vouchers from the Nested Nodes
Azure Local SFF uses FDO (FIDO Device Onboarding) vouchers for zero-touch provisioning. The repo includes Get-SffNodeVoucher.ps1, which discovers the nested VMs (via the DHCP scope or explicit IPs), connects over SSH, and pulls the PEM voucher files to the host.
From PowerShell, run:
C:\Scripts\Get-SffNodeVoucher.ps1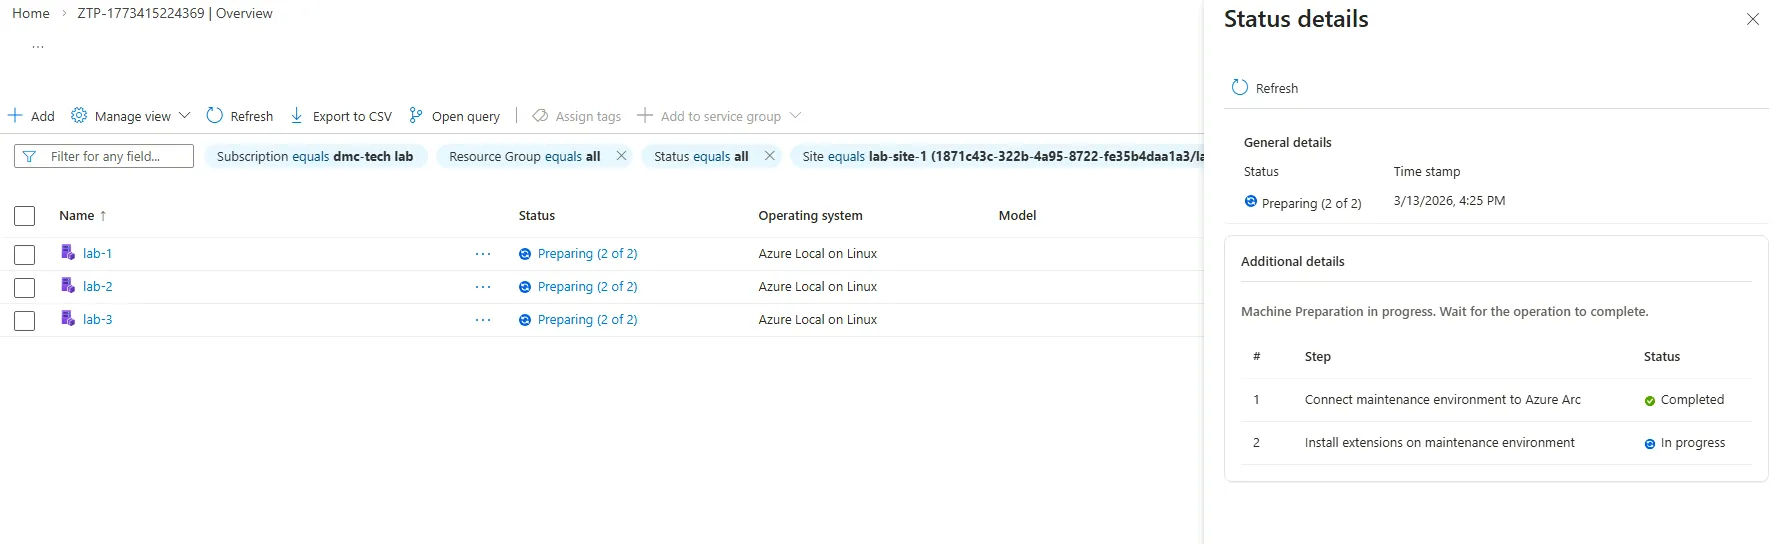
Vouchers are saved under C:\vouchers\<ip>\ on the host.
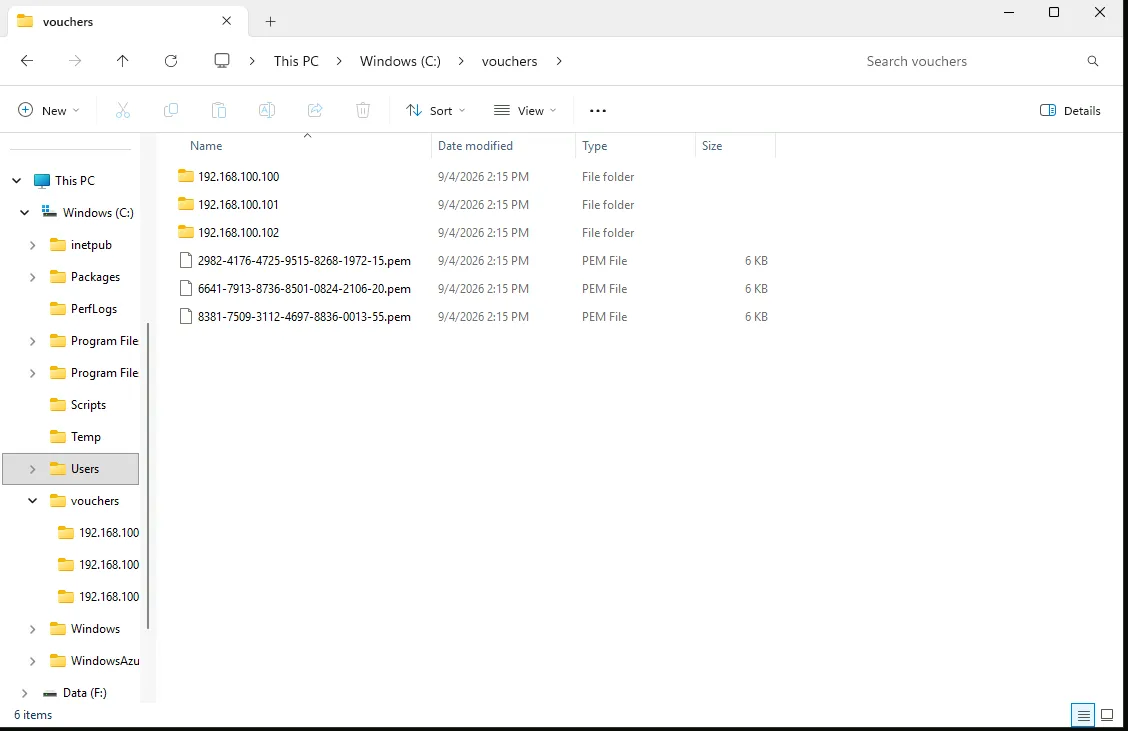
Step 7 - Register Vouchers in Azure to Provision the Nodes
With the FDO voucher PEM files on the host, the next step is to register them in Azure so the nodes are provisioned and managed as Azure Local devices.
In the Azure Portal, go to Azure Arc (search for “Arc” or “Azure Arc” in the top search bar). In the left menu, under Operations, open Machine provisioning (preview). Select Provision under 2. Provision machines.
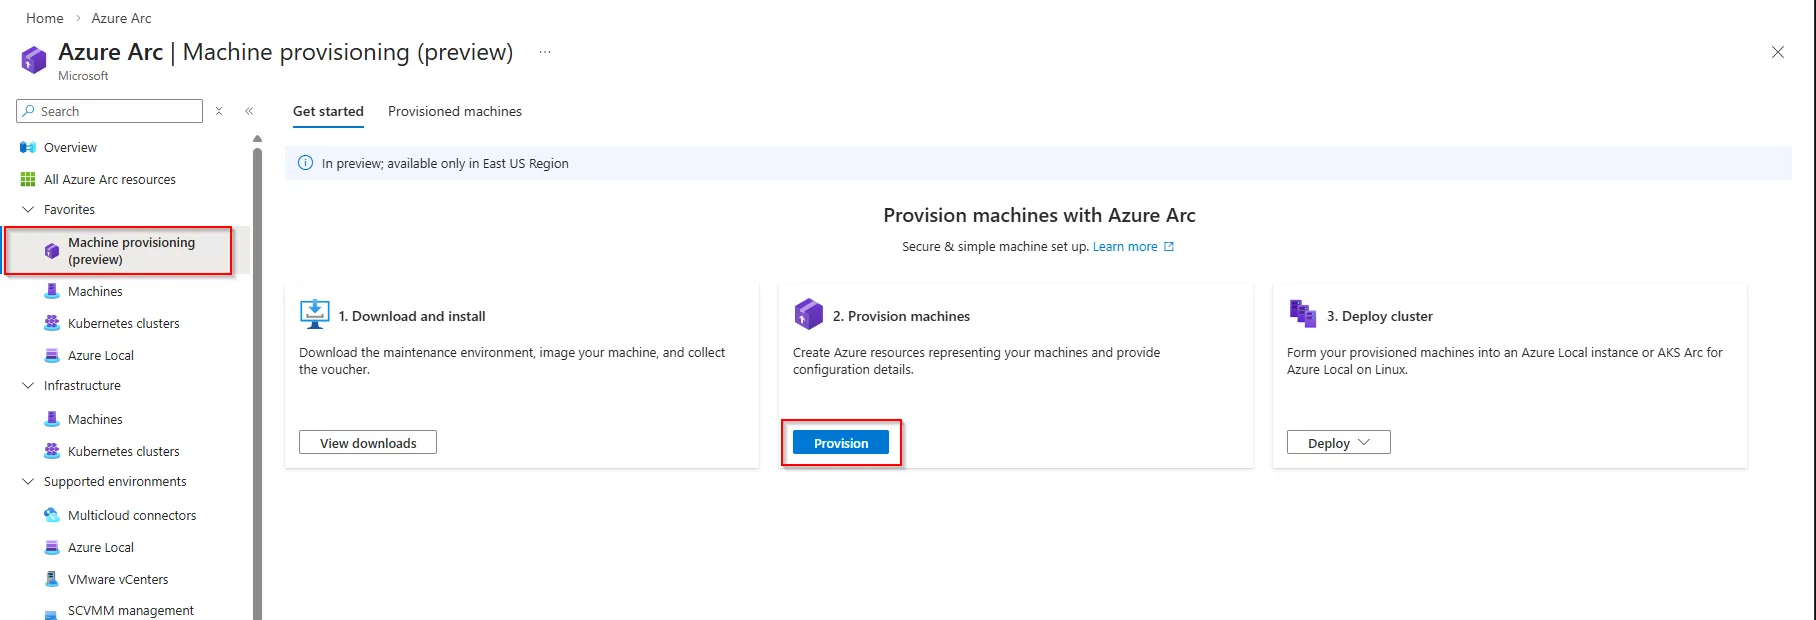
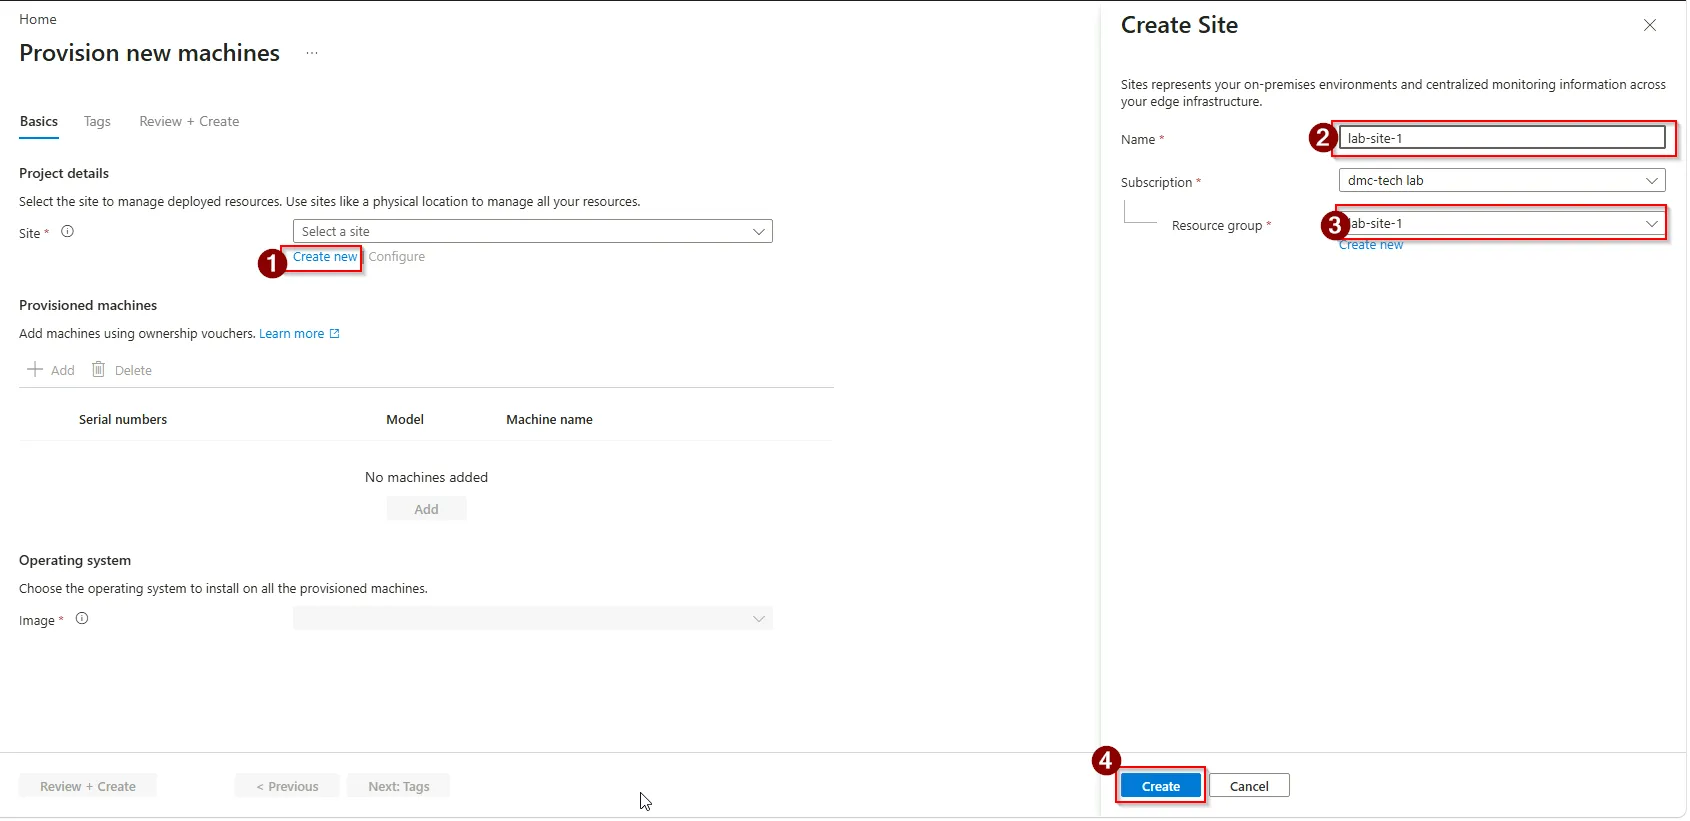
A site needs to be created to associate the nodes to. Click on Create new (1) and then enter a Name (2) and Resource group (3) name in the new form that appears. Click Create (4) to generate the site.
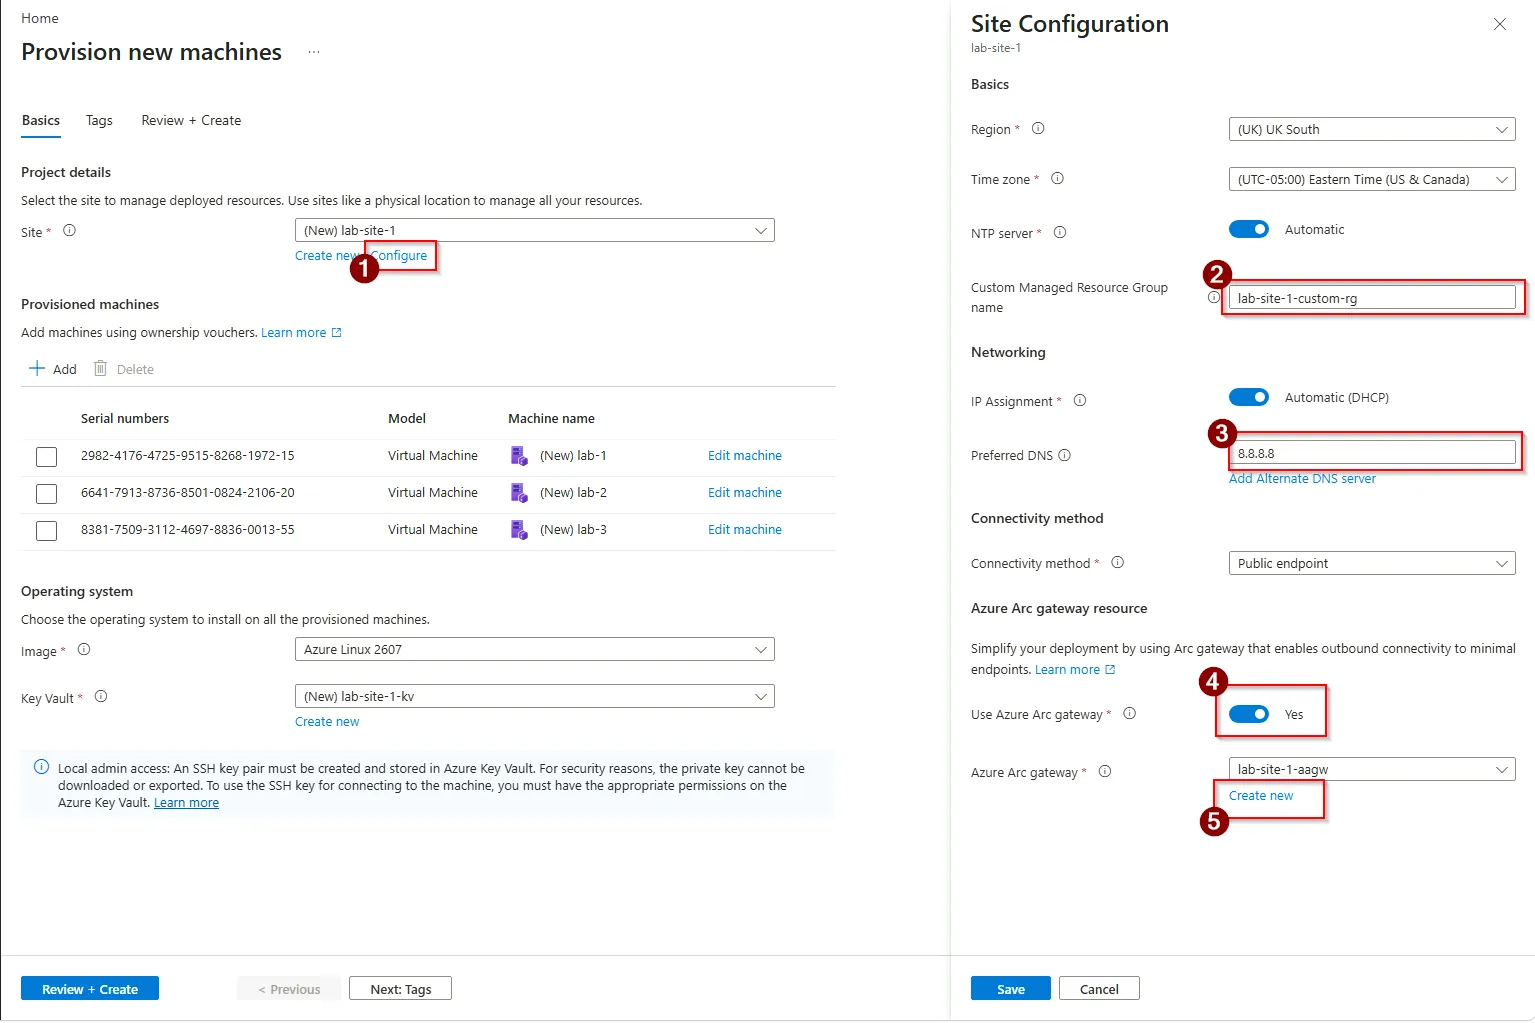
Once the site has been created, it needs to be configured to use Azure Arc Gateway. The region for the site for the Public preview must be set to one of the following:
- eastus
- eastus2
- eastus2euap
- centralusueap
Click on Configure (1) to open the config blade.
Enter the Custom Manager Resource Group Name (2), Set the Preferred DNS(3), Ensure Use Azure Arc gateway (4) switch is set to use and then click on Crate new (5) Azure Arc Gateway.
Enter the name of the Azure Arc gateway (1) and click on OK (2) to create.
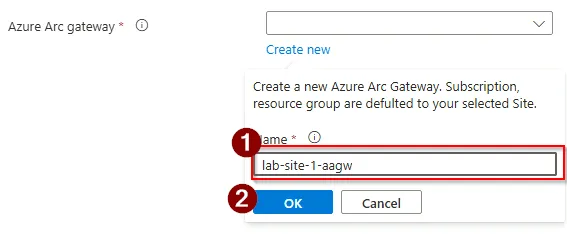
When the gateway is created, click on Save
Next, click on Add (1) in the Provisioned machines section. Click on Browse (2) and add the voucher files from C:\vouchers\<voucher>.pem then Add (3).
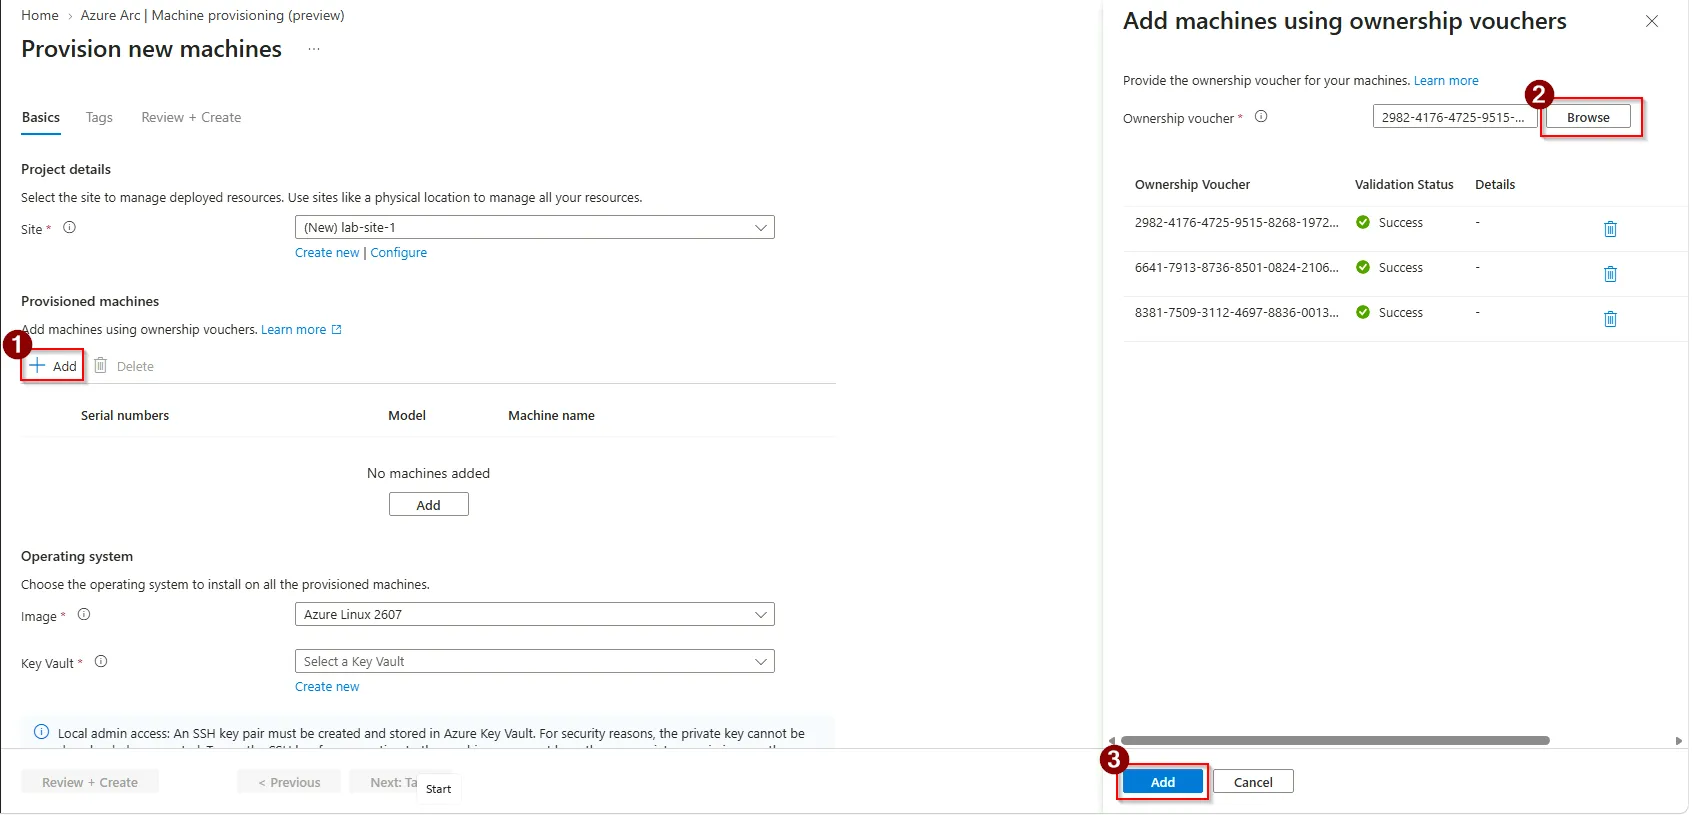
Start the flow to provision a new device or register a device (wording may vary-look for “Add device”, “Provision device”, or “Register with voucher”). Choose the option that accepts an FDO voucher or upload voucher file.
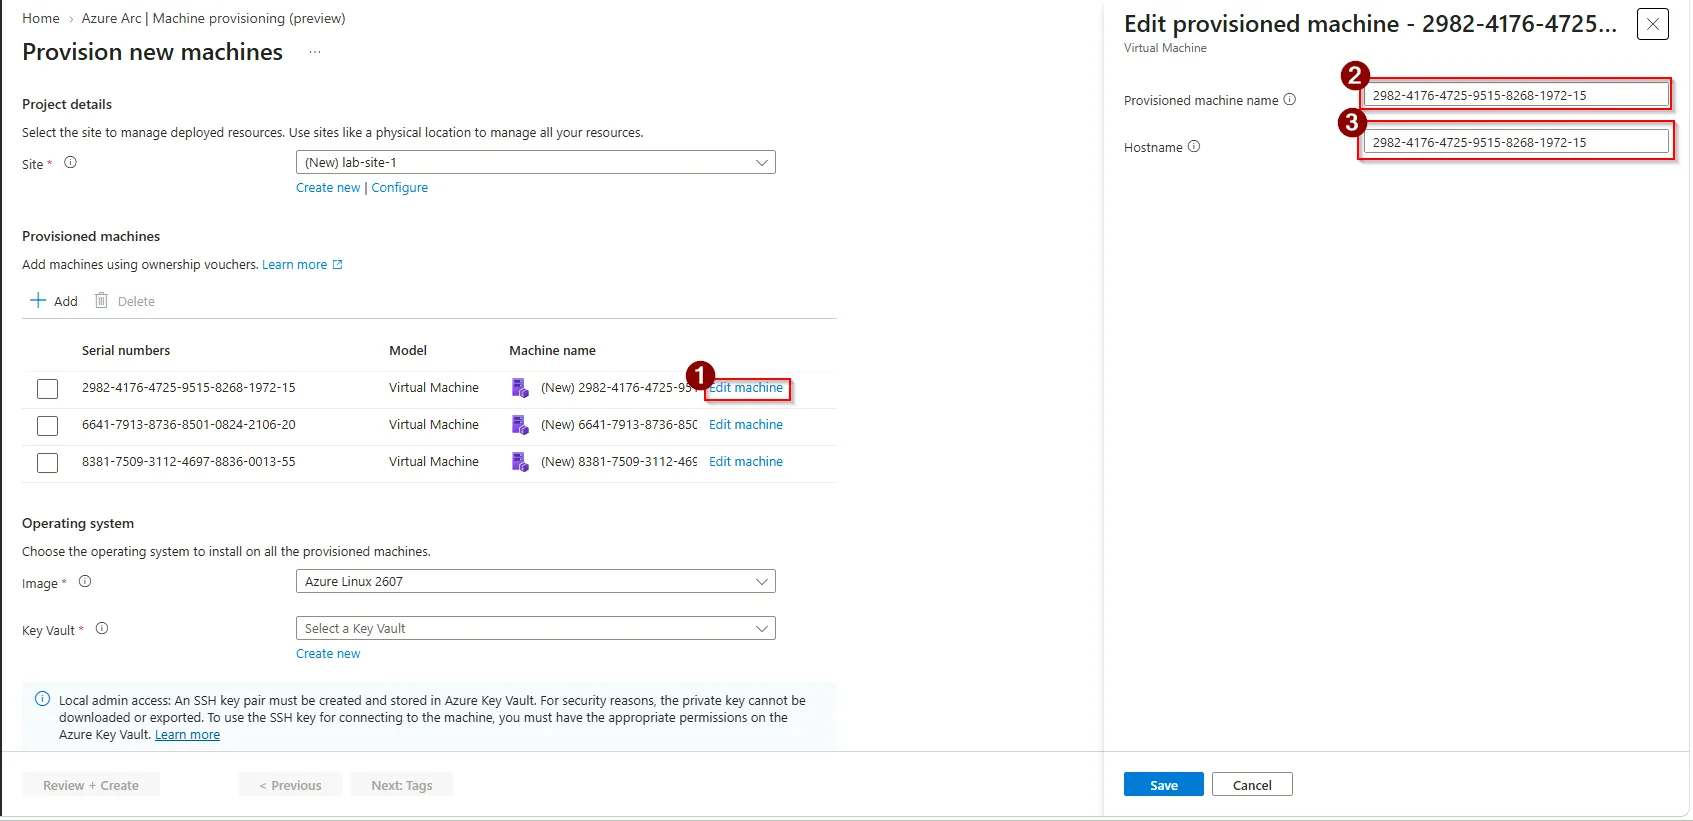
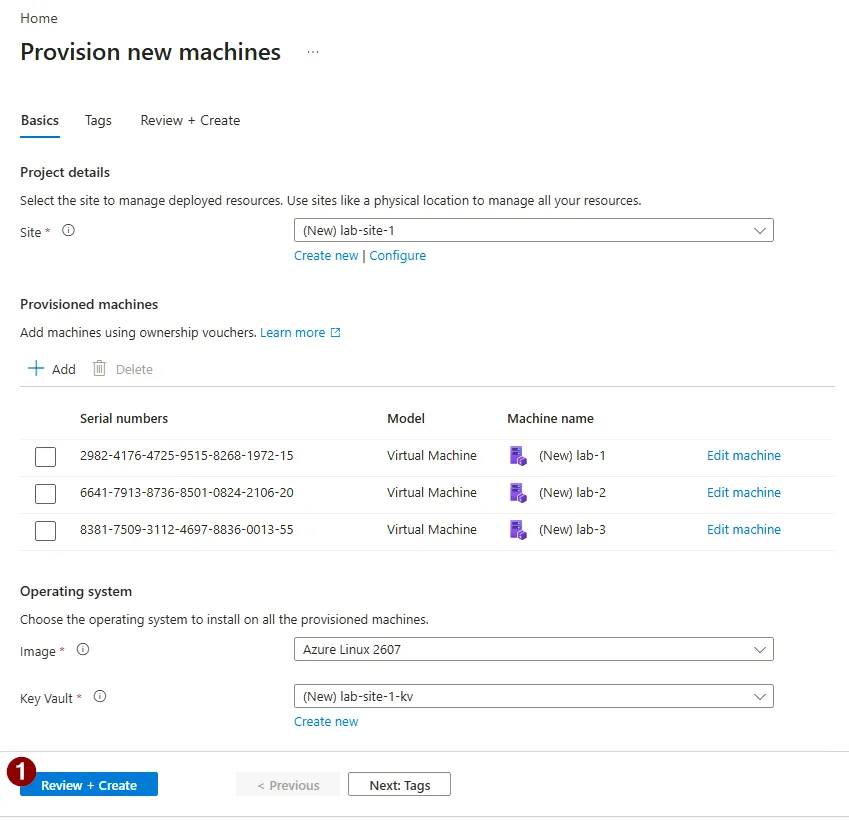
For each node, upload the corresponding PEM file from C:\vouchers\<voucher>.pem on the Hyper-V host (you can copy the files to your local machine or use Bastion and the portal from the same browser). Once uploaded, you can then change the name of the machine to make it more readable.
An SSH key pair must be created and stored in an Azure Key Vault. This can be provisioned by clicking Create new.
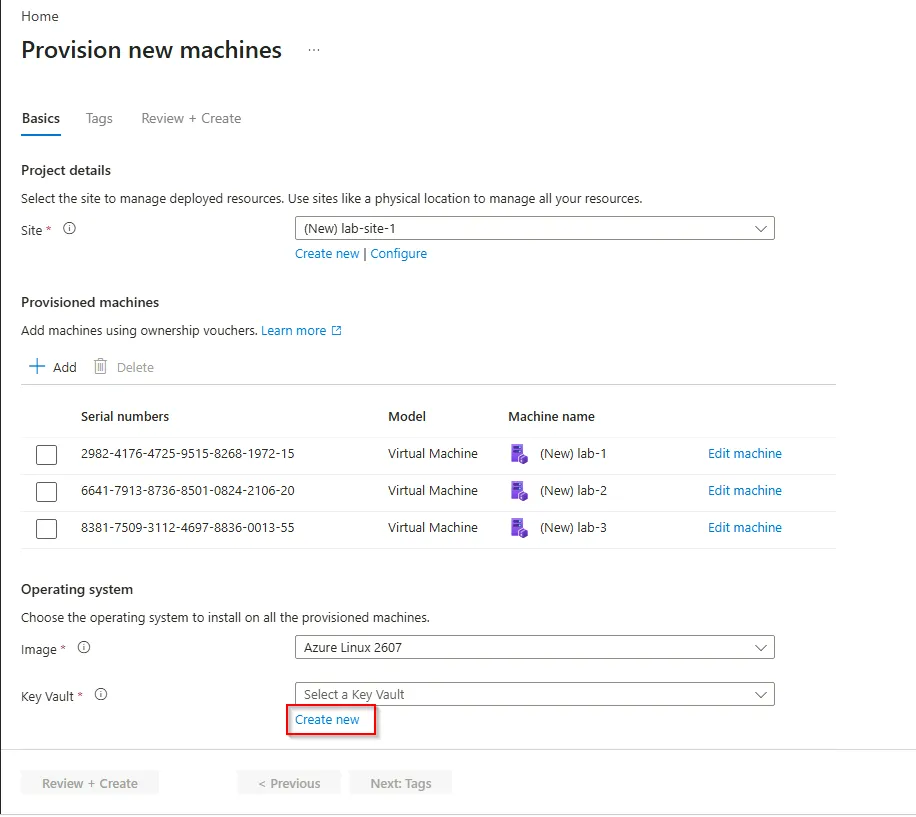
Enter the Key vault name (1), Region (2) name, and Pricing tier (3) as Standard, then click Next (4)
Ensure all the Resource access options are selected and click Review + create (1)
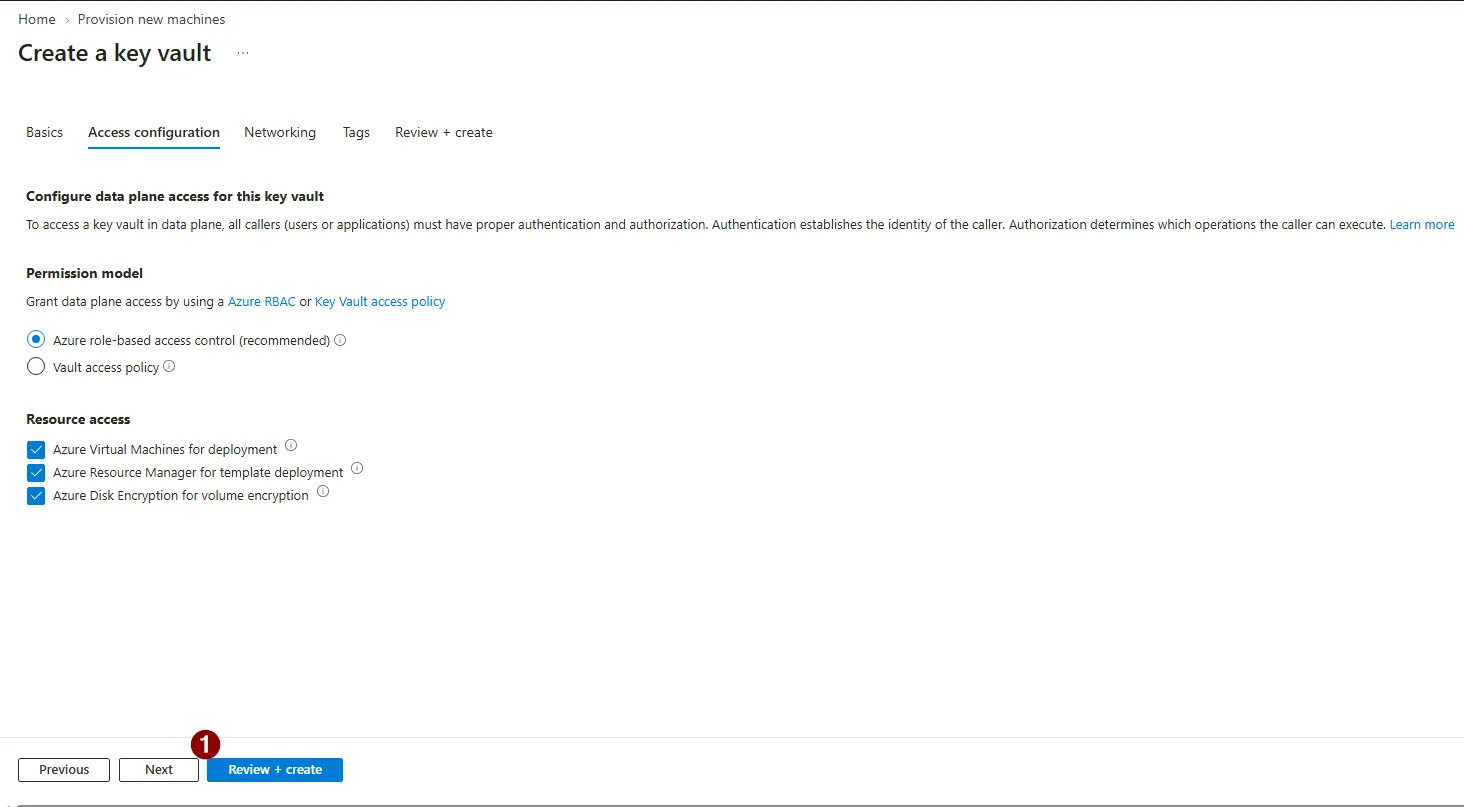
Once you’re happy with the changes, click on ‘Create (1)’ to provision the key vault.
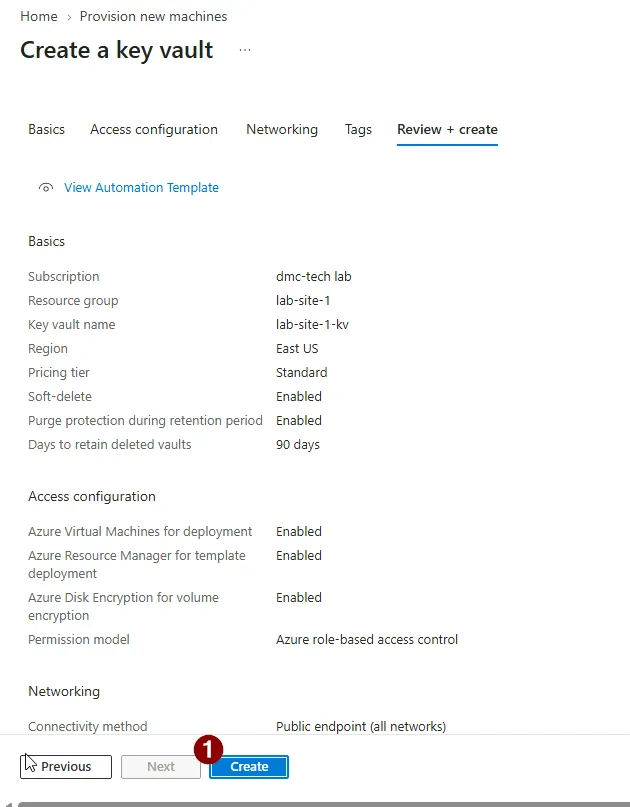
Once the key vault is provisioned and you’re happy with the changes, click on ‘Review + Create’ and then start the provisioning process.
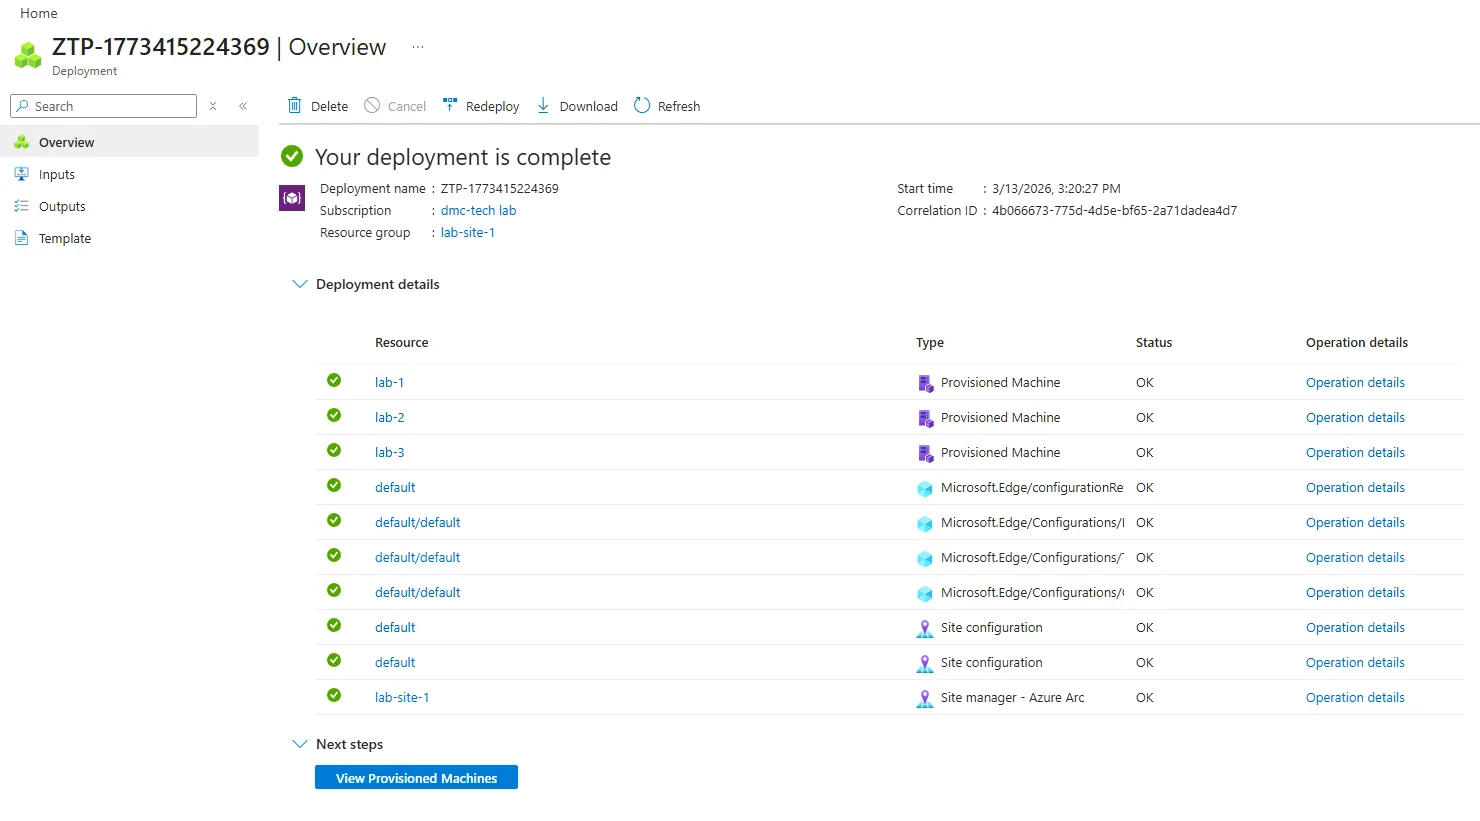
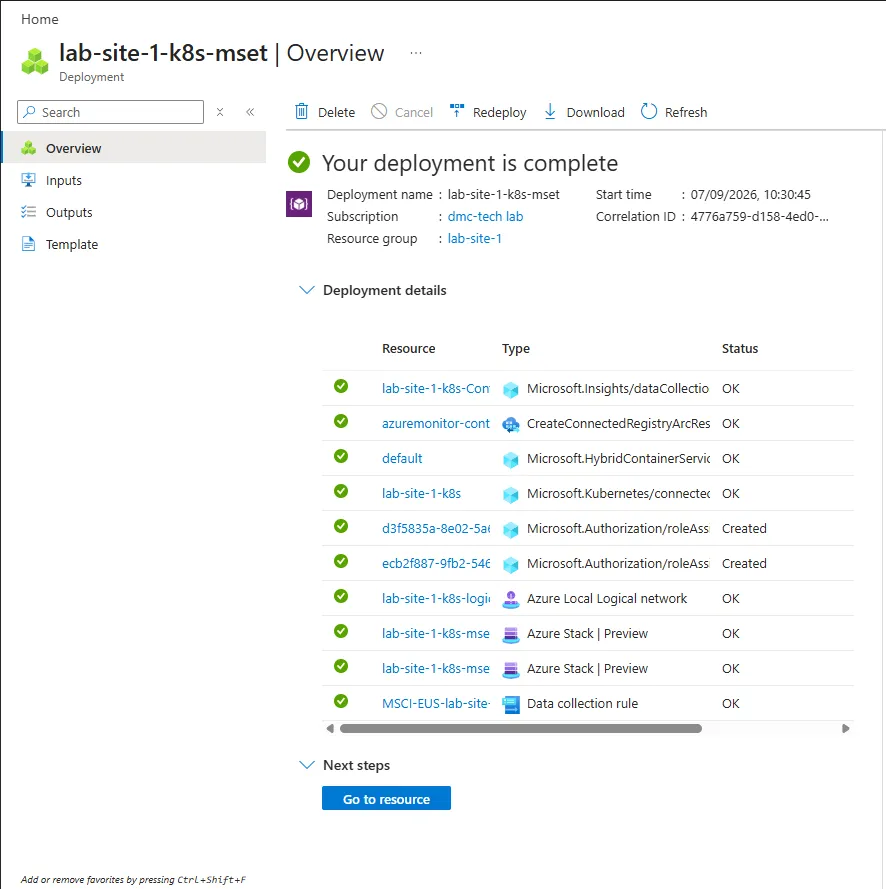
You can see the various ARM resources are created in the deployment process. Once complete, View Provisioned Machines.
After registration, Azure will provision the devices. You can track status in the Azure Arc -> Machines provisioning (Preview) -> Provisioned machines view. We can see the step progress by selecting the status link for the node.
Once provisioning completes, the nodes appear as Ready to Cluster.
From there, follow the documentation as described on the for the scenario you want to test.
Step 8 - Cost and Shutdown
The lab uses a Standard_E32s_v5 VM, so it’s not cheap if left on 24/7. The Terraform config includes an auto-shutdown schedule at 19:00 GMT every day. You can change or disable it in the Terraform if you prefer. When you’re done testing, either rely on that or run:
terraform destroy(And optionally tear down the bootstrap state storage if you don’t need it anymore.)
That’s it. You’ve got a repeatable lab for Azure Local SFF on an Azure VM: Terraform for infra, a single Windows host with nested Hyper-V, and scripts to get from zero to three nodes ready for ZTP.
Happy testing!
Quick Reference
| What | Where |
|---|---|
| Setup script log | C:\Scripts\setup.log |
| Setup / voucher scripts | C:\Scripts\setup.ps1, C:\Scripts\Get-SffNodeVoucher.ps1 |
| Nested VM storage | F:\Hyper-V |
| Vouchers (default) | C:\vouchers\<ip>\ |
| Nested network | 192.168.100.0/24, DHCP 192.168.100.100–200 |
Installing Terraform and Azure CLI
If you don’t have Terraform or Azure CLI yet, here’s how to get them. Official install docs are linked below if you need more detail or a different OS.
Terraform
- Official install guide: Install Terraform | HashiCorp Developer
Windows (PowerShell):
- Option A - winget:
winget install Hashicorp.Terraform - Option B - Chocolatey:
choco install terraform - Option C - Manual: Download the Windows AMD64 zip from terraform.io/downloads, extract it, and add the folder to your
PATH.
macOS:
- Homebrew:
brew tap hashicorp/tapthenbrew install hashicorp/tap/terraform
Linux:
- Using apt (Debian/Ubuntu): See the HashiCorp Linux install instructions; they provide a repo and package name.
- Manual: Download the right zip from terraform.io/downloads, extract, and add the binary to your
PATH.
Check the install with:
terraform versionYou want 1.0 or newer.
Azure CLI
- Official install guide: Install Azure CLI | Microsoft Learn
Windows:
- Option A - MSI installer: Download and run the installer from the Azure CLI install page.
- Option B - winget:
winget install Microsoft.AzureCLI
macOS:
- Homebrew:
brew update && brew install azure-cli
Linux:
- One-line install (most distros):
curl -sL https://aka.ms/InstallAzureCLIDeb | sudo bash
(See the Microsoft docs for other package managers.)
Check the install and sign in:
az version
az login
After az login, pick your subscription if you have more than one:
az account set --subscription "Your Subscription Name or ID"